Unveiling The Wonders Of Science: Experiments With Everyday Objects
Unveiling the Wonders of Science: Experiments with Everyday Objects
Related Articles: Unveiling the Wonders of Science: Experiments with Everyday Objects
Introduction
In this auspicious occasion, we are delighted to delve into the intriguing topic related to Unveiling the Wonders of Science: Experiments with Everyday Objects. Let’s weave interesting information and offer fresh perspectives to the readers.
Table of Content
Unveiling the Wonders of Science: Experiments with Everyday Objects

Science is not confined to sterile laboratories; it thrives in the everyday world, hidden within the ordinary objects we use daily. This very ordinariness allows us to engage with scientific principles in a tangible, accessible way, fostering a deeper understanding and appreciation for the world around us. By transforming household items into tools for exploration, we can unlock fascinating scientific phenomena, making learning both enjoyable and insightful.
This exploration delves into the realm of science experiments using household items, unveiling the underlying principles and practical applications of scientific concepts. The experiments presented are not merely entertaining diversions but gateways to a deeper understanding of the physical world, offering a hands-on approach to scientific learning.
The Magic of Density: The Egg Experiment
One of the most classic and visually engaging experiments involves the density of liquids. This experiment demonstrates the concept of buoyancy and how objects of different densities behave in liquids.
Materials:
- Glass jar or container
- Water
- Salt
- Raw egg
Procedure:
- Carefully place the raw egg in the glass jar filled with water. Observe that the egg sinks to the bottom.
- Gradually add salt to the water, stirring continuously until the egg floats.
Explanation:
The egg sinks in pure water because it is denser than water. When salt is added, the density of the water increases. As the density of the water approaches the density of the egg, the buoyant force acting on the egg becomes greater, causing it to float.
Learning Outcomes:
This simple experiment demonstrates the concept of density and its relationship to buoyancy. It also highlights the impact of dissolved substances on the density of liquids.
Exploring Surface Tension: The Penny Challenge
Surface tension is a fascinating phenomenon that allows liquids to resist external forces, creating a thin, elastic-like layer on their surface. The penny challenge is a fun experiment that visually showcases this property.
Materials:
- Penny
- Water
- Dropper or pipette
Procedure:
- Place a penny on a flat surface.
- Slowly drop water onto the penny using the dropper.
- Observe how many drops of water can be added before the water spills over the edge of the penny.
Explanation:
Surface tension allows the water molecules to form a thin, elastic layer on the surface of the penny, creating a dome-like structure. As more water is added, the dome becomes more pronounced, but the surface tension holds the water in place until it reaches its limit.
Learning Outcomes:
This experiment illustrates the concept of surface tension and how it influences the behavior of liquids. It also highlights the relationship between surface tension and the shape of a liquid droplet.
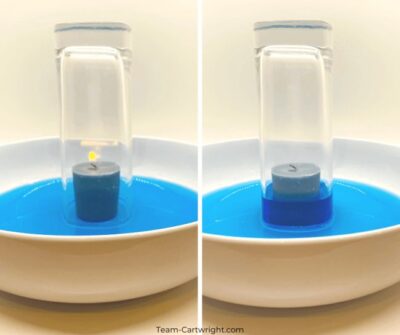
The Power of Air Pressure: The Balloon in a Bottle
Air pressure is a fundamental force that governs many phenomena in our environment. This experiment demonstrates the power of air pressure and how it can be used to create a simple yet effective device.
Materials:
- Plastic bottle (with a narrow neck)
- Balloon
- Matches or a lighter
Procedure:
- Inflate the balloon partially and place it over the mouth of the bottle.
- Light a match or a lighter and hold it inside the bottle for a few seconds.
- Quickly remove the match or lighter and place the balloon over the bottle’s mouth.
- Observe the balloon inflating itself.
Explanation:
Heating the air inside the bottle increases its temperature and volume, causing the air pressure inside the bottle to rise. When the bottle is sealed, the hot air expands, pushing against the balloon and causing it to inflate. As the air cools down, the pressure inside the bottle decreases, but the balloon remains inflated.
Learning Outcomes:
This experiment demonstrates the concept of air pressure and its relationship to temperature. It also highlights the principle of thermal expansion and the effect of pressure on gases.
The Science of Sound Waves: The String Telephone
Sound waves are vibrations that travel through a medium, such as air. This experiment explores the transmission of sound waves using a simple string telephone.
Materials:
- Two empty paper cups
- String (approximately 10-15 feet long)
- Scissors
- Tape
Procedure:
- Use the scissors to poke a small hole in the bottom of each paper cup.
- Thread the string through the holes in the cups and tie knots at the ends to secure the string.
- Have two people hold the cups, each with one end of the string.
- One person speaks into their cup while the other listens to the other cup.
Explanation:
When you speak into the cup, the sound waves cause the bottom of the cup to vibrate. These vibrations travel along the string as mechanical waves, reaching the other cup and causing its bottom to vibrate. These vibrations then generate sound waves in the air, allowing the listener to hear the message.
Learning Outcomes:
This experiment demonstrates the transmission of sound waves through different mediums. It also highlights the role of vibration in sound propagation.
The Chemistry of Color: The Cabbage Indicator
Red cabbage contains a natural pigment called anthocyanin, which acts as a pH indicator, changing color in response to different pH levels. This experiment explores the chemistry of color and the concept of pH.
Materials:
- Red cabbage
- Water
- Several clear glass containers
- Household substances with different pH levels (e.g., vinegar, baking soda, lemon juice, soap)
Procedure:
- Boil the red cabbage in water for about 10 minutes.
- Strain the liquid into a separate container, creating a red cabbage indicator.
- Pour a small amount of the indicator into each glass container.
- Add a few drops of each household substance to the different containers, observing the color changes.
Explanation:
The anthocyanin in the red cabbage indicator changes color depending on the acidity or alkalinity of the solution. In acidic solutions, the indicator turns red or pink, while in alkaline solutions, it turns blue or green.
Learning Outcomes:
This experiment demonstrates the concept of pH and its effect on the color of substances. It also introduces the idea of natural indicators and their applications in chemistry.
Exploring Magnetism: The Compass Experiment
Magnetism is a fundamental force that governs the behavior of magnets and magnetic materials. This experiment explores the properties of magnets and the Earth’s magnetic field using a simple compass.
Materials:
- Compass
- Bar magnet
Procedure:
- Place the compass on a flat surface and observe the direction the compass needle points. This is the direction of the Earth’s magnetic north pole.
- Bring the bar magnet near the compass, holding it at different angles and distances.
- Observe how the compass needle responds to the magnet’s presence.
Explanation:
The compass needle is a small magnet that aligns itself with the Earth’s magnetic field. When a bar magnet is brought near the compass, its magnetic field interacts with the Earth’s magnetic field, causing the compass needle to deflect towards the magnet.
Learning Outcomes:
This experiment demonstrates the properties of magnets and their interaction with magnetic fields. It also introduces the concept of the Earth’s magnetic field and its role in navigation.
The Science of Electricity: The Simple Circuit
Electricity is a fundamental force that powers our modern world. This experiment explores the basic principles of electricity using a simple circuit.
Materials:
- Battery
- Wire (insulated copper wire)
- Light bulb (small, low-voltage bulb)
- Switch (optional)
Procedure:
- Strip a small amount of insulation off the ends of the wire.
- Connect one end of the wire to the positive terminal of the battery and the other end to the bottom contact of the light bulb.
- Connect another wire to the negative terminal of the battery and the other end to the top contact of the light bulb.
- Observe the light bulb lighting up.
Explanation:
When the circuit is complete, electrons flow from the negative terminal of the battery through the wire to the light bulb, lighting it up. The light bulb acts as a resistor, converting electrical energy into light and heat.
Learning Outcomes:
This experiment demonstrates the basic principles of electrical circuits, including the flow of current, voltage, and resistance. It also highlights the importance of a closed circuit for electrical current to flow.
Beyond the Basics: Expanding the Scope of Experiments
These experiments are just a starting point for exploring the wonders of science using household items. By adapting these basic principles, you can delve into more complex scientific concepts and phenomena.
For example, you can investigate the principles of optics by creating a pinhole camera, exploring the properties of light and its interaction with matter. You can also delve into the world of chemical reactions by creating your own volcano using baking soda and vinegar, demonstrating the principles of acid-base reactions and gas production.
FAQs on Science Experiments with Household Items
Q: What are the benefits of conducting science experiments with household items?
A: Conducting science experiments with household items offers several benefits:
- Accessibility: These experiments require readily available materials, making them accessible to everyone, regardless of resources.
- Engagement: The use of familiar objects makes learning more engaging and relatable.
- Hands-on Learning: These experiments encourage active participation and promote a deeper understanding of scientific principles.
- Creativity: The use of everyday objects fosters creativity and encourages experimentation with different materials and methods.
Q: Are these experiments safe for children?
A: Most experiments using household items are safe for children, but adult supervision is always recommended. It’s essential to choose age-appropriate experiments and ensure children understand the safety precautions involved.
Q: How can I make these experiments more educational?
A: To enhance the educational value of these experiments, consider the following:
- Background Research: Encourage children to research the scientific concepts behind the experiments before carrying them out.
- Record Keeping: Encourage them to record their observations and findings in a notebook or journal.
- Discussion and Analysis: Discuss the results of the experiments and encourage children to draw conclusions and make connections to other scientific concepts.
- Further Exploration: Encourage them to explore related topics and conduct additional experiments based on their findings.
Q: Can I use these experiments to teach STEM concepts?
A: Absolutely! These experiments provide an excellent foundation for teaching STEM concepts. By integrating these experiments into educational activities, you can foster a love for science and encourage critical thinking, problem-solving, and creativity in children.
Tips for Successful Science Experiments with Household Items
- Safety First: Always prioritize safety and ensure proper supervision, especially with children.
- Clear Instructions: Provide clear and concise instructions for each experiment.
- Engage All Senses: Encourage children to use all their senses to observe the experiments, including sight, sound, touch, and smell.
- Encourage Questions: Foster a questioning environment and encourage children to ask questions and explore their curiosities.
- Connect to Real-World Applications: Discuss the real-world applications of the scientific principles explored in the experiments.
- Have Fun: Remember, learning should be enjoyable. Encourage a playful and enthusiastic approach to exploring the world of science.
Conclusion
Science is not a distant, abstract subject; it is woven into the fabric of our everyday lives. By engaging with science through simple experiments using household items, we can unlock a world of wonder and discovery, fostering a deeper appreciation for the natural world and its underlying principles. These experiments are not merely entertaining diversions but stepping stones to a more profound understanding of the world around us, inspiring a lifelong love for learning and exploration. Through the lens of these simple experiments, we can ignite a spark of curiosity and pave the way for a future generation of scientists, innovators, and critical thinkers.


Closure
Thus, we hope this article has provided valuable insights into Unveiling the Wonders of Science: Experiments with Everyday Objects. We appreciate your attention to our article. See you in our next article!